

Advanced Prompt Engineering Techniques: Examples & Best Practices
Prompt engineering is a crucial skill for maximizing the potential of large language models (LLMs). The way a question is framed has a significant effect on an LLM’s output. Even a slight change in the text can result in a vastly different response.
This article provides a comprehensive guide to advanced prompt engineering techniques, including self-ask decomposition, step-back prompting, and more. You can use them to enable models to tackle complex tasks by breaking down problems, reasoning step-by-step, or generating follow-up questions.
After reading this guide, you will have the practical knowledge to write prompts that generate more accurate and nuanced responses for complex tasks.
Summary of advanced prompt engineering techniques
The remainder of the article delves into these advanced prompt engineering techniques in detail.
One-shot and few-shot prompting
Few-shot prompting means providing a few representative input-output examples within your prompt to show the model exactly what format or style you expect. Suppose you want the model to translate English sentences into a custom dialect of English that uses old Victorian-era language. A few-shot prompt could look like:
Translate the following sentences into Victorian English.
Example 1:
Input: "Where are you going?"
Output: "Whither goest thou?"

Example 2:
Input: "I don't understand what you mean."
Output: "I comprehend thee not."

Now it's your turn:
Input: "Please wait for me at the garden."
Output:
Structured examples of input and output clearly demonstrate the required output format and style.
Similarly, one-shot prompting uses exactly one example while zero-shot prompting provides no examples.
Use this prompting technique when a task is ambiguous and the model's default knowledge is insufficient to answer a user’s query. Including examples in a prompt helps demonstrate the desired tone, structure, or logic.
Self-ask decomposition
Self-ask decomposition is a prompting technique where we explicitly tell the model to decompose a complex question into smaller sub-questions. We then request the model to answer the sub-questions and derive the final conclusion.
If a single question involves several unknown problems or tasks, a self-ask approach ensures the model doesn’t skip important details.
For example, the prompt “Should I pursue a master’s in data science?” is a broad question with many considerations. A self-ask decomposition technique-based system prompt for answering this question could be as follows:
Break the user's question into multiple sub-questions that are required to answer the main question. Answer each sub-question and then provide a final recommendation.
To answer the user’s question based on the system prompt, the model might then generate sub-questions such as “What are your career goals?”, “What is your current background?”, “What is your financial and time investment capacity?”, etc., and proceed to answer each one.
Finally, it synthesizes an answer like a human would: weighing the answered sub-parts to give a recommendation. This structure helps the model avoid overlooking any critical aspect of the decision.
Use self-ask prompting for questions requiring reasoning across multiple pieces of knowledge or multiple deduction steps.
Chain-of-thought (CoT) prompting
In COT prompting, you ask a model to “think sequentially”, producing a series of intermediate reasoning steps (often in natural language) before generating a final response.
CoT prompting is simple to implement. A classic usage is adding a phrase like “Let’s think this through step by step” to the query. For instance:
If a train travels 30 miles in 50 minutes, how far will it travel in 1.5 hours (90 minutes) at the same speed? Think step by step before generating a final response, and show all intermediate steps in your response.
Chain-of-thought prompting can be combined with a few-shot examples: providing one or two worked examples of step-by-step reasoning in the prompt.
Advanced models like GPT-4o and Google’s Gemini, by default, use chain-of-thought techniques to answer a user’s query. However, explicit CoT prompting can further improve a model’s response.
You can use CoT prompting for any problem that requires reasoning or calculation across multiple steps. This includes mathematical problems, multi-step logical deductions, complex word problems, or any scenario where an intermediate reasoning process will help ensure accuracy.
Tree-of-Thoughts (ToT) prompting
Tree-of-Thoughts is an advanced strategy that generalizes the idea of chain-of-thought. Instead of a single linear chain of reasoning, it encourages the model to explore multiple branches of reasoning at each step. In essence, the model treats the problem like a decision tree: it proposes different possible steps or ideas, evaluates them, and chooses which branch to follow, potentially backtracking if a path seems unpromising.
There’s no single standardized format for tree-of-thought prompting (it’s more of a framework concept). One approach is to explicitly instruct the model to generate several possible next steps, evaluate them, and then continue. Here is an example of a ToT prompt.
Consider the problem of designing a new feature for a software product. First, brainstorm three different approaches (thoughts) to implement the feature, enumerating them as Thought 1, Thought 2, and Thought 3. Then, for each thought, briefly evaluate its pros and cons. Decide which option seems best and explain why, then outline the next steps to implement that chosen approach."
In this prompt, the model isn't just producing one line of reasoning; it's producing a small tree:
- Multiple initial ideas
- Evaluation of each outcome
- Choice of one to delve into.
This structured approach ensures that the model considers alternatives rather than blindly following one path.
You should use ToT for complex problem-solving tasks with many possible solution paths. Examples include strategic planning, puzzle solving, game playing, or design/ideation tasks.
Step-back prompting
Step-back prompting is a technique where you first ask the model for an initial analysis or an overview, and then follow up with a more specific question based on the model's previous response. Here is an example prompt:
List the major factors affecting user churn in a mobile app.
The model might respond with a bullet list: e.g., pricing, user experience issues, lack of new content, competition, etc. Once we have that, we follow up:
Now, given those factors, what steps would you recommend to reduce churn for our app?
Because the model has enumerated the key factors, its recommendation can now explicitly address each factor, e.g., “To address pricing, consider offering a cheaper tier... For user experience, improve onboarding and reduce bugs...,” and so on.
The result is a more structured and comprehensive answer than if we had directly asked “How do I reduce user churn?” from the start.
Step-back prompting is useful when the user isn't entirely sure what they need. By first asking a high-level question, you get the model to surface relevant factors or options. Then you can ask a pointed question using that information.
{{banner-large-dark-2="/banners"}}
Meta prompting
Meta prompting involves asking the model to help improve the prompt itself. In other words, we engage the model in creating or refining the prompt before actually answering the user’s question. This is a two-step approach: first, the model is prompted to generate a better or more detailed prompt given an initial query; second, that generated prompt is used (possibly automatically) to get the final answer from the model.
For example, if a user’s query “What should I pack for vacation?” is quite open-ended. A meta system prompt could be:
Rewrite the user's question to make it more precise and detailed for a travel planning assistant, then answer the refined question.
In such a case, the model automatically asks follow-up questions like: "Do you mean a beach vacation, city trip, or hiking holiday? Where and when will you travel?"Based on the user’s response, it will rewrite the question as:
'What should I pack for a [destination] vacation in [month/season], considering [activities]?'"
The model then tries to answer all aspects of the question.
Meta prompting is useful when the initial query is vague or underspecified. For example, users often ask questions that lack context or have multiple possible interpretations. Instead of directly producing an answer that might miss the mark, the model first rephrases or clarifies the question as a form of self-check.
Contextual priming
Contextual priming refers to prepending the prompt with relevant context or data, thereby informing the model’s answer. This is the principle behind Retrieval-Augmented Generation (RAG): retrieve relevant documents or facts and add them into the prompt before asking the question. However, contextual priming can also be as simple as providing a summary of the situation, the role the model should play, or any constraints, before you ask your actual question.
For example, if we want the model to answer a question about our company’s product with accurate details, we might do something like:
[Company Background]
Our company, AcmeTech, specializes in renewable energy solutions. We offer solar panels, wind turbines, and energy storage systems. Our target customers are small to medium businesses (SMBs) looking to reduce their carbon footprint and energy costs.
[User Question]
Generate a Q4 marketing plan that highlights our new solar panel technology for SMB customers.
In summary, contextual priming does not expect the model to know everything or figure everything out from scratch. Instead, you give it the right ingredients up front, which leads to more accurate, on-topic, and useful responses.
It is pertinent to mention that contextual information must fit into the context window of an LLM model. Therefore, it is essential to keep the context concise and with only relevant information.
Use contextual priming whenever the query could be answered more accurately or specifically if the model had certain information that it otherwise might not know or remember.
Self-consistency
Self-consistency is a technique used to enhance reliability. It generates multiple answers and then lets the model (or a simple programmatic method) select the most consistent one. The intuition is that the majority answer is more likely to be correct.
This can be achieved by writing a custom script that executes five times or by asking the model to output five answers simultaneously, separated by a delimiter. Here is an example.
Answer the user's question five times independently (with different random seeds) and then identify the answer that appears most frequently.
By explicitly asking for multiple attempts and a final answer, you help the model cross-check its own work. This technique reduces random errors and is a form of ensemble method at the prompt level.
Consider self-consistency for important or ambiguous queries where you want high confidence in the result. It is particularly applicable in multi-step reasoning tasks (e.g. math or logic) where one chain might make a mistake, but most chains converge on the correct reasoning.
Remember to factor in token usage and associated costs, which can increase exponentially.
ReAct prompting
The ReAct framework (short for Reason+Act) combines chain-of-thought reasoning with the ability to call external tools or simulate actions in a textual environment. In practice, a ReAct prompt enables the model to alternate between Thoughts (where it reasons or explains what to do next) and Action (where it produces a command, such as a search query, a calculation, or an API call). After the action, the result is fed back to the model as an observation, and the cycle continues.
Here is an example of a ReAct prompt in action:
You are an AI that can think and act in a step-by-step manner.
Follow this format:
Thought: <the AI's thought>
Action: <the action the AI decides to take>
Observation: <the result of the action>

Begin.

User Query: Who is the president of France, and what is his age?
Thought: I need to find who the current president of France is.
Action: Search["current president of France"]
Observation: "The current president of France is Emmanuel Macron."
Thought: The president is Emmanuel Macron. Now I need to find his age.
Action: Search["Emmanuel Macron age"]
Observation: "Emmanuel Macron was born December 21, 1977."
Thought: He was born in 1977, so in 2023, he is 45 years old.
Final Answer: The President of France is Emmanuel Macron, who is 45 years old.
In this format, the model’s prompt explicitly instructs it to alternate between thinking and acting.
Use ReAct prompting when you need the model to perform tasks that involve intermediate steps, interacting with external data or tools. The Action could be a pseudo-code for searching, a database lookup, a calculator function, etc., depending on what tools the model has. For example, if you want the model to answer a question by first searching a database or doing a calculation, ReAct is suitable.
Prompt design principles
Beyond specific prompting tricks, general best practices apply to nearly all prompt engineering work. Let’s first discuss some common principles for designing prompts.
Use system messages or high-level instructions
Always use system messages to set the overall behavior of the model, e.g., the model’s persona or rules the LLM should follow. A system message can specify things like “You are an expert travel assistant,” or “Always answer in JSON format unless told otherwise.” This helps anchor the model’s responses from the start.
Explicitly specify the desired output format
If you need the answer in a specific format (e.g., list, JSON, code), specify this explicitly in the prompt. For instance:
- “Answer with a JSON object containing keys 'solution' and 'explanation'.” or
- “Provide the answer as a bullet list.”
This is particularly important if you want to plug a model’s output into another process.
Use delimiters to isolate distinct prompt parts
A common technique is to use triple backquotes ``` or other markers to separate system instructions, context data, and the user query. Delimiters signal to the model what context is, versus what the actual question is, reducing confusion and accidental inclusion of irrelevant text in the answer.
Simulate roles or perspectives
Assigning roles can guide the tone and knowledge of a model. For example, telling the model to “Act as a cybersecurity expert” or “Pretend you are interviewing the user for a job and respond accordingly” can significantly influence the style and content of the response.
Behavioral optimization practices
Even with a well-crafted prompt, the nature of LLMs is that they generate random responses. Here are some techniques to optimize and control the model’s behavior:
Calibrate randomness (temperature and top-p)
The temperature parameter controls the level of creativity or randomness in the model’s output.
- A high temperature (e.g., 0.8–1.0) can produce more diverse or creative answers.
- A low temperature (0–0.3) makes outputs more deterministic and focused (useful for factual Q&A or code generation where consistency is key).
- Top-p (nucleus sampling) can be adjusted to control diversity.
Calibrating these for your use case is key.
Chain techniques for better control
Sometimes a single prompt is not enough to guarantee the desired behavior. You can chain multiple prompt steps (as we saw with step-back prompting or meta prompting). Another chaining approach involves first asking the model to critique or analyze an initial answer and then fix it.
Control verbosity or tone via instructions
If the model tends to be too verbose, you can add an instruction like “Be concise” or even specify a word limit (though the latter isn’t always strictly followed). Conversely, if you need more detail, say, “Explain each step in detail.” Tone can be controlled by instructions like “Respond in a friendly and casual tone” vs. “Respond in a formal, technical manner suitable for an engineering report.” The model usually adheres to such cues.
Iterative prompt testing and refinement
Treat prompt development as an iterative process. Try a prompt on a variety of representative inputs, see where it fails or produces suboptimal output, and tweak accordingly.
Evaluation and monitoring practices
Evaluation and monitoring are crucial, especially as prompts become part of production systems. Let’s see some evaluation and monitoring best practices.
Write unit tests
Create a set of test cases for your prompt just as you would for a code module. For each test input, have an expected ideal output or at least define success criteria. Run your prompt through these tests whenever you modify it or when the model API is updated. This will catch prompt errors before an update is deployed.
LLM-as-a-judge
A clever way to evaluate outputs is to use another LLM (or the same LLM in a different mode) to score or classify the output quality. For instance, you can prompt an LLM: “Here is a question, and here are two answers from different prompts. Which answer is more correct? Score them from 1 to 10.”
This LLM-as-a-judge approach provides a qualitative sense of which prompt is better. It’s beneficial when human evaluation is expensive or slow. You can use GLIDER from PatronusAI as a state-of-the-art LLM as a judge model.
Log prompt interactions and feedback
Log the prompts and responses (with proper privacy measures if needed) in production. Logging is also essential for traceability, as if something goes wrong (like the model outputs something inappropriate), you want to know what prompt produced it and under what conditions.
Version control for prompts
Just like code, version your prompts, which can be as simple as keeping them in a Git repo or using a dedicated prompt management tool such as PatronusAI prompt management. When you update a prompt, note what changed and why. This way, if a new prompt version performs worse, you can roll back easily or understand what change caused the regression.
Tooling and integration
As you develop more complex applications with LLMs, managing prompts and their interactions with other system components becomes a challenge. Good tooling and integration practices can make this manageable:
Use orchestration frameworks
Libraries like LangChain, LlamaIndex, or others allow you to chain prompts, manage conversational state, and integrate external tools with LLMs. These frameworks reduce the boilerplate of calling APIs and help organize multi-step prompts (like ReAct style agent loops).
Externalize prompts from code
Hardcoding prompts in your application code can become a maintenance headache. Instead, consider storing them in configuration files (such as YAML or JSON), databases, or using a prompt management system like Patronus AI.
Implement fallback prompts or strategies
No prompt is perfect. Sometimes a prompt might fail, e.g., the model refuses to answer because it misunderstood the request as disallowed content, or it just produces nonsense. It’s wise to have fallback logic in place.
This could be a simpler prompt version that you know is very safe, which you use if the fancy prompt fails. Or it could be automatically retrying with a slight modification (like adding “No, really, it’s okay to answer).
Leverage prompt management platforms
Tools like Patronus AI assist with various aforementioned tasks, including prompt storage, versioning, evaluation, and logging. It provides an user interface to compare prompts side-by-side, run batch experiments, and keep a history of changes and performance. It saves time, especially as your library of prompts and use cases grows.
How Patronus AI helps
Let’s see a couple of examples of how you can use Patronus AI for efficient prompt engineering.
Prompt comparison using Patronus Evaluators
Patronus AI provides various evaluators that you can use to see the effect of your prompts on a model’s response.
Let’s see how you can compare two prompts in a RAG application using a Patronus evaluator that employs the Glider judge LLM to see if a model’s response is factually consistent with the retrieved context.
Note: The code for this example is available in this Google Colab notebook.
Step 1 - Install Patronus and other Python libraries required to run the code.
!pip install -qU patronus
!pip install -qU openai
!pip install -qU smolagents[toolkit] smolagents[litellm]
The following script imports the required libraries in your Python application.
import pandas as pd

from openai import OpenAI

import patronus
from patronus.datasets import Row
from patronus.experiments.types import TaskResult
from patronus.experiments import run_experiment
from patronus import evaluator, RemoteEvaluator
from patronus.datasets import read_csv

from google.colab import userdata
PATRONUS_API_KEY = userdata.get('PATRONUS_API_KEY')
OPENAI_API_KEY = userdata.get('OPENAI_API_KEY')
Step 2 - Enable tracing in the Patronus dashboard.
patronus.init(
    api_key=PATRONUS_API_KEY,
    project_name="advanced-pe-techniques",
    app="prompt-comparison-and-evaluation",
)

oai_client = OpenAI(
    api_key = OPENAI_API_KEY
)
Step 3 - Import a CSV file containing questions and the context.
In real RAG applications, you will retrieve context from a vector database. For the sake of simplicity, we are using a dataset that already contains a question and the context to answer the question.
We also converted the dataset into Patronus-compliant format. The official documentation explains how to create a Patronus AI dataset.
dataset = pd.read_csv("/content/validation-squad.csv")

random_records = dataset.sample(n=50)

random_records.to_csv("qa_records.csv", index=False)

print(random_records.shape)

random_records.head()


dataset = read_csv(
    "/content/qa_records.csv",
    task_input_field="question",
    task_context_field="context",
    )

dataset
Step 4 - Define your tasks.
In Patronus AI, you can create experiments that run tasks, which you can track in a Patronus dashboard. We will define two tasks: one that uses a basic RAG prompt and the other that uses an advanced RAG prompt.
The script below defines a function that uses a basic RAG prompt.
def basic_rag_prompt(row: Row, parent=None, tags=None) -> TaskResult:
    """basic rag prompt"""

    system_prompt = "Based on the context, answer the user's question."

    query = f"""
    Question: {row.task_input}
    Context: {row.task_context}
    """


    evaluated_model_output = (
        oai_client.chat.completions.create(
            model="gpt-4o-mini",
            messages=[
                {
                    "role": "system",
                    "content": system_prompt,
                },
                {
                    "role": "user",
                    "content": query
                },
            ],
            temperature = 0.0
        )
        .choices[0]
        .message.content
    )

    return evaluated_model_output
The following script defines a task containing an advanced RAG prompt.
def advanced_rag_prompt(row: Row, parent=None, tags=None) -> TaskResult:
    """advanced rag prompt"""

    system_prompt = """You are an expert in generating responses given a user question and the context.
    You will receive a user's question and the context
    Based on the context, provide an answer to the user's question.
    Only include information from the context and do not generate text inconsistent with the context.
    Your final output must be based on the facts retrieved in the context"""

    query = f"""
    Question: {row.task_input}
    Context: {row.task_context}
    """


    evaluated_model_output = (
        oai_client.chat.completions.create(
            model="gpt-4o-mini",
            messages=[
                {
                    "role": "system",
                    "content": system_prompt,
                },
                {
                    "role": "user",
                    "content": query
                },
            ],
            temperature = 0.0
        )
        .choices[0]
        .message.content
    )
    return evaluated_model_output
Step 5 - Run the evaluator
Finally, call the remote evaluator from Patronus AI ("patronus:is-factually-consistent" from the Glider) family in this case. And run your experiments using the two tasks defined.
patronus_evaluator = RemoteEvaluator("glider", "patronus:is-factually-consistent")
assistants = [
    (basic_rag_prompt, "basic_rag_prompt"),
    (advanced_rag_prompt, "advanced_rag_prompt"),
]


results = []

for assistant_func, assistant_name in assistants:
    experiment_results = await run_experiment(
        api_key = PATRONUS_API_KEY,
        dataset=dataset,
        task = assistant_func,
        evaluators=[patronus_evaluator],
        tags={"dataset_type": "qa RAG", "model": "gpt-4o"},
        experiment_name= assistant_name,
        project_name = "advanced-pe-techniques",
        )
    results.append(experiment_results)
Once you run the above code, go to the Patronus AI dashboard and click “Experiments” from the left sidebar, as shown in the following screenshot.

The above output shows that the basic RAG prompt passed 86% of the evaluations, while the advanced prompt passed 84%. This indicates that a basic prompt sometimes performs better for less complex tasks, and you do not have to consume more tokens and, consequently, more money on an advanced prompt.
For further analysis, select the two experiments to compare and click the “Compare” button in the top right.
You should see results comparing the two experiments, as shown in the following screenshot.

Complete workflow analysis with Percival
Modern LLM application workflows consist of multiple components. A slight change in the prompt can have a profound impact on these components, and thus on the final response. In such cases, point-in-time evaluation and comparison tools may not be able to identify what's happening in the hidden components of an AI pipeline.
To address this issue, Patronus AI offers Percival, an AI debugger capable of identifying more than twenty failure modes across LLM application workflows. Patronus observes the reasoning, planning, and execution of tasks at each step in an LLM application, identifies issues, and suggests tweaks to improve application performance.
Percival has the following features:
- Reviews entire traces, not just the final response
- Spots errors at the exact moment they occur
- Uncovers root causes like missed requirements or outdated API calls
- Suggests practical fixes such as prompt rewrites or tool adjustments
- Learns from past behavior with episodic memory to improve over time
- Integrates smoothly with third-party AI and analytics platforms like DataBricks
Manual analysis of a large number of traces and spans in an LLM application can be a time-consuming process. Percival is ideal for automating these tasks.
Let’s see how Percival AI can trace the input, tool calls, tool responses, the final response, and the effect of prompts in an agentic AI application developed in the SmolAgent library.
Step 1 - Install and import Python libraries.
!pip install -qqq openinference-instrumentation-smolagents
!pip install -qqq opentelemetry-instrumentation-threading
Next, we import the required libraries in our Python application.
import patronus
from openinference.instrumentation.smolagents import SmolagentsInstrumentor
from opentelemetry.instrumentation.threading import ThreadingInstrumentor
from smolagents import ToolCallingAgent, LiteLLMModel, ChatMessage, MessageRole, tool
patronus.init(integrations=[SmolagentsInstrumentor(), ThreadingInstrumentor()])
Step 2 - Create the agent
The following script creates LLM classes we will use in our application.
router_llm = LiteLLMModel(model_id="gpt-4o",
                     api_key= OPENAI_API_KEY,
                     temperature = 0)


creative_llm = LiteLLMModel(model_id="gpt-4o",
                     api_key= OPENAI_API_KEY,
                     temperature = 0.9)
The AI agent has access to two tools: `search_web` and `summarize_news`. The search web tool utilizes the OpenAI web search preview tool to search the internet, and the `summarize_news` tool then summarizes the news using an LLM we defined earlier.
@tool
def search_web(query: str) -> str:

    """
    Return websearch results for the given query

    Args:
        query: The query for which the websearch has to be performed
    """

    client = OpenAI(api_key=OPENAI_API_KEY)

    response = client.responses.create(
        model="gpt-4o",
        tools=[{"type": "web_search_preview"}],
        input=query
    )

    return response.output_text

@tool
def summarize_news(news: str, summarization_prompt:str) -> str:
    """
    Return a bullet point summary of the given news.

    Args:
        news: The news to be summarized
        summarization_prompt: The prompt to use for the summarization
    """

    prompt_msg = ChatMessage(
        role    = MessageRole.USER,         # or simply "user"
        content = f"{summarization_prompt}:\n News: {news}."
    )
    reply = creative_llm([prompt_msg])      # model returns another ChatMessage
    return reply.content

tools = [search_web, summarize_news]
Define the agent and assign it tools.
def create_agent():
  agent = ToolCallingAgent(tools= tools, model=router_llm)
  return agent
Step 3 - Enable Patronus tracing
Next, enable Patronus tracing so that Percival can analyze the application pipeline. Ensure that your patronus.yaml file is in the same directory as the file that runs your LangGraph code.
project_name: "a-nice-project-name"
app: "a-nice-app-name"
api_key: "[Your key here]"
api_url: "https://api.patronus.ai"
otel_endpoint: "https://otel.patronus.ai:4317"
ui_url: "https://app.patronus.ai"
The following script makes a call to the agent.
@patronus.traced("summarization_prompt")
def main():
  agent = create_agent()
  response = agent.run("Retrieve the latest sports news for today and summarize them in short paragraphs")
  return response
main()
Agent output

Step 4 - View trace analysis
To see the complete trace analysis, go to the Patronus AI dashboard and click “Traces”

You can see the trace of all the calls that the agent made.
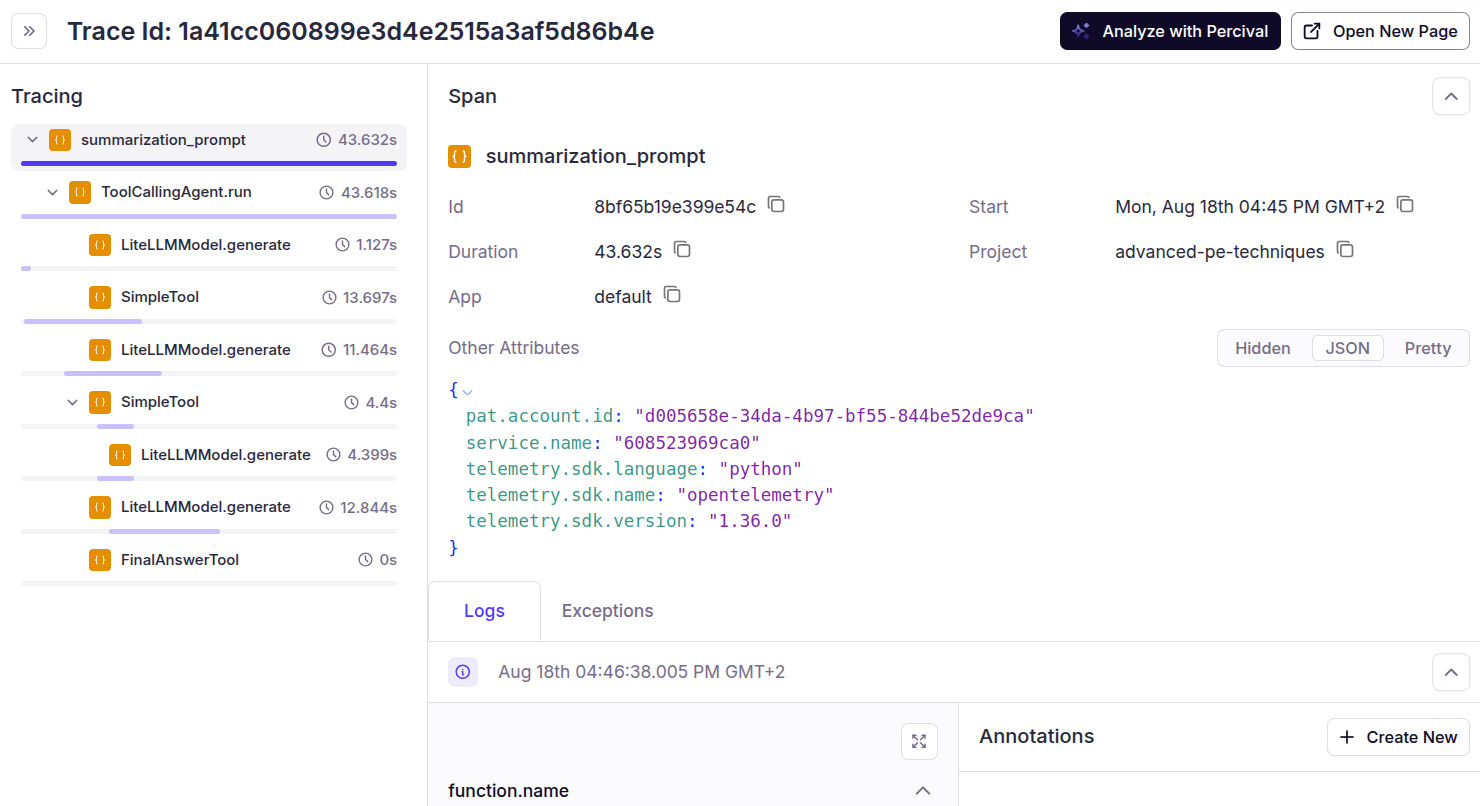
Step 5 - Analyze with Percival
Finally, click the “Analyze with Percival” button to analyze the complete workflow.

You can see that Percival identified an issue with the prompt and suggested fixes.
See these case studies to know more about how Percival helps companies debug AI applications faster and with higher accuracy.
{{banner-dark-small-1="/banners"}}
Final thoughts
Prompt engineering is essential to modern LLM applications, particularly those involving multiple components and workflows. Crafting the right prompt at each stage of the pipeline goes a long way toward building robust, scalable systems.
However, inspecting the effect of prompts on outputs is equally important. Patronus AI provides tools to evaluate, compare, and continuously improve prompts. With Patronus AI evaluators, you can evaluate and compare prompts for various use cases. Patronus’s Percival debugger allows you to trace the complete workflow and identify which prompt needs improvement to generate a correct response.
Patronus AI also allows you to store, manage, and version control LLM prompts. Visit Patronus AI to see how it helps in prompt engineering.